How to use RCG! Grilling Bags
Ready. Chef. Go!™ Grilling bags combine amazing food quality with stress-free convenience. While you’re grilling, you don’t need to turn the food over and, once you’re done, the mess stays in the bag so there’s no need to scrape the grill. To take advantage of the benefits that Ready. Chef. Go!™ bags deliver, be sure to follow these 6 simple steps and check out our cooking tips to get the best results:
How to use Ready. Chef. Go!™ Grilling Bags:
1) Place your ingredients inside the bag on top of the non-stick parchment paper; you can add butters, marinades, sauces, herbs, and spices as desired.
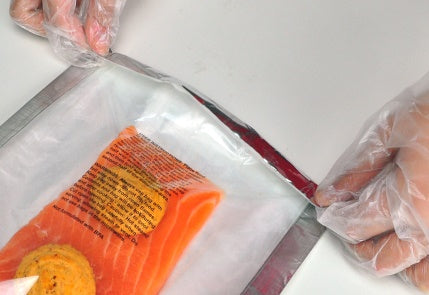
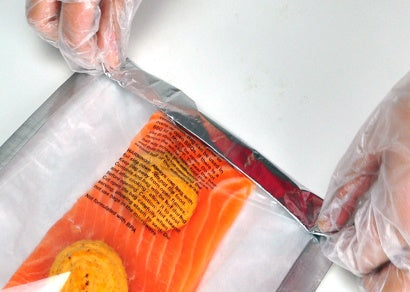
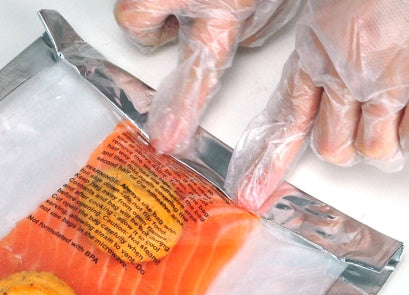
2) Make sure the sealing area is clean and dry. Peel off the paper adhesive strip, fold the end of the bag over approximately 1 inch (so it covers half the adhesive sealing area), and then fold over again over the remaining part of the adhesive to make a sturdy, leak-resistant double fold.
3) Pre-heat the grill (or oven) and, when ready, place the bag on the grill with the aluminum foil side facing down. Be sure to cook with the grill lid open and do not flip the bag, both sides of the food will still cook evenly.
4) Gradually monitor the food until it is fully cooked. You can refer to this list of recommended cooking times to assist you.
5) Take the bag off of the grill when the food appears ready or cooked thoroughly. We recommend checking proteins with a meat thermometer to ensure they are fully cooked.
6) Let the bag stand for a minute or two to cool off. Beware of hot steam and liquids when opening. Cut the bag open with scissors, plate the food, and then enjoy your meal! Remember, there’s no need to scrape the Grill after use!
General Cooking Tips:
• Do not pierce or puncture the bag before cooking. While cooking, the bag will inflate but will not burst since it’s designed to vent excess steam through the sealing area.
• You can use spices, seasonings, butters, or sauces. Be creative! Add any combination of flavoring you like to your meal to add your personal touch.
• You can cook proteins and vegetables together as desired. Feel free to cook proteins and vegetables in the same bag together. Just remember, for the best results, we recommend using no more than 1½ pounds (24 ounces) of food per bag. If you are cooking more than that, you should use multiple bags.
• Ensure that the food is cooked thoroughly cooked prior to consumption. If the food needs additional cooking time, just refold the bag and place it back on the grill or in the oven for additional time until properly cooked.
• After cooking, allow the bag to stand for at least one minute before opening. This allows hot steam to escape before opening the bag. When opening, also be wary of hot liquids.
Grilling Tips:
• Do NOT flip the food. One of the coolest features of Ready. Chef. Go!™ Grilling bags is that the food will cook evenly without having to flip it.
• Cook the food at a medium temperature setting (or lower) with the grill lid open. When the grill lid is closed, the temperature inside the grill can rise rapidly and, with a high flame, can cause the parchment paper to burn.
Oven Tips:
• Thoroughly preheat oven. Be sure the oven has been completely preheated before placing the grilling bag inside. Don’t cook at temperatures above 400° F.
• Place on a baking sheet in the center rack of the oven. Although it’s not completely necessary, we recommend placing the grilling bag on a baking sheet with the aluminum side facing down when cooking in the oven.